The limits of my language mean the limits of my world. – Ludwig Wittgenstein
While you definetely could play a text adventure using the normal ChatGPT interface, I want to represent my efforts of a more flexible approach using the LangChain Framework, which uses the OpenAI API backend.
While the resulting app is not exactly much better than simply feeding in the very same prompt to ChatGPT, it's a great learning experience to get more aquiainted with LangChain.
We start by creating our llm model and a template for the prompt we want to feed into the it. Here I use an OpenAI model, which requires a corresponding OpenAI API key. If you already have an OpenAI account you can create a key here. It's good practice to store such a key in our environment variables. An easy way to manage your environment variables is by installing the dotenv package and setting the key in a local ".env" file. load_dotenv() will then load that file and set the specified variables for the runtime of the script.
from dotenv import load_dotenv
load_dotenv()
from langchain_openai import ChatOpenAI
from langchain_core.prompts import ChatPromptTemplate, MessagesPlaceholder
from langchain_core.messages import HumanMessage
from langgraph.graph import MessagesState

llm = ChatOpenAI(model="gpt-4o-mini")

prompt = ChatPromptTemplate([
    ("system", """
You are now the guide of a mystical journey in the Whispering Woods.
The protagonist seeks the lost Gem of Serenity.
You must navigate the protagonist through challenges, choices and consequences,
dynamically adapting the tale based on the traveler's decisions.
Your goal is to create a branching narrative experience where each choice
leads to a new path, ultimately determining the protagonist's fate.

Here are some rules to follow:
1. Start by explaining the setting and asks the player to choose some kind of weapons that will be used later in the game
2. Have a few paths the lead to success
3. Have some paths that lead to death. If the protagonist dies generate a response that explains the death.
"""),
    MessagesPlaceholder(variable_name="messages"),
])
The first part of the prompt is the system message, which set's the context in which the actual user message (i.e. user input) should be processed. User messages are accumulated in the MessagesPlaceholder which we can refer to with the name 'messages'.
Building chains
LangChain provides a specialized syntax that enables chaining together separate components to form a sequence, or "chain." The key prerequisites for chaining are:
Each component must implement the Runnable interface
The output of one component must match the input format of the next component in the chain
Chains are created using the pipe (|) operator:
runnable = prompt | llm
The semantics of this statement is that (as you might have guessed) the prompt will be feed into the llm. We can later trigger the chain by simply calling
runnable.invoke().
Working with state
The stateful counterpart to chains in LangChain is referred to as graphs. In a LangChain-graph, each node represents an operation or action to be performed, and these nodes are implemented as Python functions. At a later stage, nodes can be connected in flexible, arbitrary ways to form a complete graph.
The most commonly used type of graph is a state graph. This type relies on a shared state object, which all nodes access and act upon. While you can define this state yourself, LangChain provides a convenient built-in option called MessagesState, which is well-suited for our simple application.
graph = StateGraph(state_schema=MessagesState)
Here we initialize a state graph, which uses the MessagesState class to manage it's state.
Now, let's introduce our nodes. As mentioned earlier, nodes are simply Python functions. However, since all nodes should operate on a shared state, they are more accurately described as functions that always accept a state argument and return a new state.
Our first node will instruct the LLM to continue the story for our text adventure game:
Let’s break this function down:
1. Passing the state to the runnable.
Why can we simply pass the state to our runnable? This is because states in LangChain behave like Python dictionaries. When invoke is called, the dictionary representation of the state is passed to the prompt template. LangChain then checks if any key in the dictionary matches a placeholder in the template. If a match is found, the placeholder is filled, and the resulting prompt is sent to the LLM, which returns an AIMessage object.
We will later start our application by invoking this node and passing it a state like this:
initial_state = {"messages": [HumanMessage("Let's play a round of text adventure")]}
This state will be relayed to the runnable. The prompt template will look for a variable called messages, find it and fill in the value into the template. The completed templated will be passed on to the LLM, which will generate an answer and return an instance of an AIMessage, which is just a thin wrapper around the actual text generated by the LLM.
2. Returning a new state.
As required, we must return a new state object. You might expect something like this:
return MessagesState(...)
However, LangChain simplifies this process with a convenient feature: we can return a standard Python dictionary, which LangChain automatically converts into a MessagesState object.
3. Updating the state.
Note that our function seems to return a new state with only the generated AIMessage. However, once more there happens more under the hood than whats immediatelly visible. The MessagesState class will actually automatically append any new messages to the state and not override it. So the state object after a single run of 'continue_story' may look like this:
{"messages": [
    HumanMessage("Let's play a round of text adventure"),
    AIMessage("You awaken to the sound of rustling leaves..."),
]}
When defining a custom state class, you can yourself decide how each field should be updated.
If you revisit our prompt you will see that we query the LLM to end each story section with some kind of choice for the user. The handel user actions we need to process user input which is our next node:
The good thing here is, that we do not require any special form of input. As long the LLM can make sense of it, we do not care wheater the user types a number, a single word or text. By the same mechanics as above, we append user input to the messages field in our state object and are finished. In principle we could already wrap around to continue_story, and our game would work. However, doing so could lead to strange outcomes when the player wins or dies in the game. To address this, we need to break the loop whenever one of these ending conditions is reached. To achieve this, we install a check_game_over node immediately after the continue_story node.
Enforcing structured output
To implement this mechanism, we leverage a powerful feature of LangChain that allows us to enforce a structured output format for LLM responses. This is done by defining a class that represents the desired structure of the output.
from pydantic import BaseModel, Field

class GameProgress(BaseModel):
    """Decide how the game should progress, that is continue or end"""
    go_on: bool = Field(description="Flag indicating if the game should go on (True) or should end (False)")


def check_game_over(state):
    decider_llm = llm.with_structured_output(GameProgress)
    last_ai_message = state["messages"][-1]
    game_progress = decider_llm.invoke(last_ai_message.content)
    return game_progress.go_on
LangChain currently supports two approaches for this: Pydantic classes (inheriting from BaseModel) and TypedDict classes.
TypedDict: These are simple and require no additional dependencies. They’re ideal for lightweight use cases.
Pydantic: While slightly more complex, Pydantic offers runtime validation of the generated data and allows us to define default values.
Regardless of which approach you use, the docstrings in your class and fields provide crucial metadata for the LLM. These should succinctly describe the purpose of the class and its fields. Additionally, type annotations ensure the LLM produces values of the correct type.
Here’s an example of creating a constrained LLM instance using the Pydantic class defined above:
The decider_llm is now constrained to produce instances of the GameProgress class, regardless of the input it receives. In our example, we pass the most recent part of the story to the decider_llm, and it determines whether the game is still ongoing or has reached its conclusion. The check_game_over function then evaluates this decision and returns a boolean, which is used to select one of two branches in the game logic graph.
With all of our nodes defined it's time to wire them up into a graph. For that we need to tell LangChain which of our functions represent nodes and how they are connected.
Building the graph
you can think of the graph, as beeing a flow chart of your app. We simply
Each node in the graph corresponds to a specific function or process, while the edges define how data transitions between nodes.
from langgraph.graph import StateGraph, END

graph = StateGraph(state_schema=MessagesState)
graph.add_node(continue_story)
graph.add_node(get_user_input)
graph.add_conditional_edges(
    "continue_story",
    check_game_over,
    {True: "get_user_input", False: END}
)
graph.add_edge("get_user_input", "continue_story")
graph.set_entry_point("continue_story")

app = graph.compile()

def run_game():
    initial_state = {"messages":
        [HumanMessage("Let's play a round of text adventure")]
    }
    app.invoke(initial_state)

if __name__ == "__main__":
    run_game()
Most of this is relatively straightforward. The tricky part is our 'check_game_over' node because depending on it's output our graph needs to get the user input next (and then loop back around) or branch off and stop the app. This is setup with:
graph.add_conditional_edges(
    "continue_story",
    # check_game_over returns a key to determine the next node:
    check_game_over,
    {True: END, False: "get_user_input"}
)
So from continue_story we install two conditional edges. One leading to END which is a special node imported from langgraph and the other leading to the get_user_input node. Which branch to take is determined by the key returned from check_game_over.
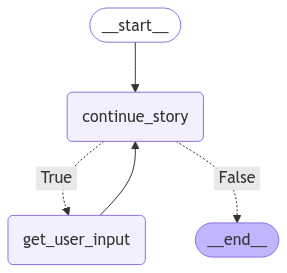
All in all our graph turns out to be realy simple:
Visualization of the created graph. Note that the visualization is a little misleading, since 'True' and 'False' are not actually output by the continue_story node, but by the check_game_over node.
The means to create such visualizations are again integrated with Langchain. Here are two utility functions to output a graph in png or ascii format:
import os

def draw_mermaid_graph(app):
    png_graph = app.get_graph().draw_mermaid_png()
    with open("adventure_graph.png", "wb") as f:
        f.write(png_graph)

    print(f"Graph saved as 'adventure_graph.png' in {os.getcwd()}")

def draw_ascii_graph(app):
    ascii_graph = app.get_graph().draw_ascii()
    print(ascii_graph)
Our journey through building a simple text adventure game using LangChain has come to an end. Along the way, we explored key concepts like creating prompt templates, chaining runnables, managing state, enforcing structured outputs, constructing a basic graph, and handling conditional edges. I hope this project not only introduced you to the fundamentals of LangChain but also sparked your curiosity and creativity.
But this is just the beginning. The graph we’ve built is intentionally simple, designed as a foundation for you to build upon. The possibilities are endless, and here are just a few ideas to expand this system further:
Adding more nodes to introduce complex storylines, puzzles, or combat mechanics.
Incorporating richer user interactions, such as inventory management or dialogue trees.
Using external APIs to fetch dynamic content, like real-world trivia or weather, to influence the story.
Creating more elaborate visualizations of your graph to track intricate narrative pathways.
I hope you enjoyed this post and feel inspired to take your own stories to the next level!